Blenders can be your secret weapon when it comes to making creamy and delicious nut butter at home, even if you don’t have a food processor. With just a few simple steps and some patience, you can create homemade nut butter that is perfect for spreading on toast, drizzling over oatmeal, or dipping fruits and veggies. Follow this guide to learn how to make nut butter without a food processor and enjoy the wholesome taste of homemade goodness.
Key Takeaways:
- Use a blender or immersion blender: You can make nut butter without a food processor by using a blender or an immersion blender.
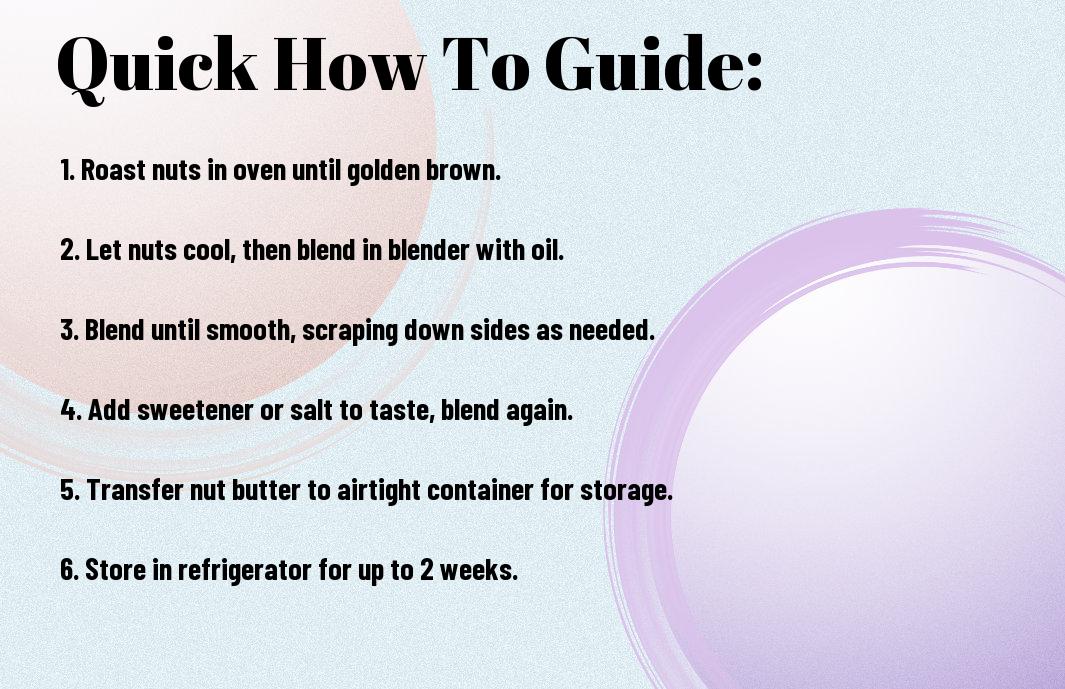
- Roast nuts for better flavor: Roasting the nuts before blending can enhance the flavor of the nut butter.
- Add oil for smoother texture: Adding a small amount of oil, such as coconut oil or vegetable oil, can help achieve a smoother texture in your homemade nut butter.
Choosing the Right Nuts
While making nut butter without a food processor, selecting the right nuts is crucial for achieving the desired taste and texture. Factors such as flavor, oil content, and texture play a significant role in determining the outcome of your homemade nut butter.
Factors to Consider When Selecting Nuts
- Flavor profile of the nuts
- Oil content for smooth consistency
- Texture preferences for the end result
Perceiving the nuances between different types of nuts will help you create a nut butter that suits your taste preferences perfectly.
Tips for Roasting Nuts for Optimal Flavor
- Roast nuts at a low temperature to prevent burning
- Allow the nuts to cool before processing to avoid bitterness
Nuts develop a deeper, richer flavor profile when roasted correctly. Knowing the optimal roasting techniques will enhance the taste of your homemade nut butter.
- Knowing when nuts are properly roasted through their aroma
Nuts release a fragrant aroma when they are roasted to perfection, indicating that they are ready for the next step in the nut butter-making process.
Grinding Methods
Using a Blender: Tips and Tricks
It can be challenging to make nut butter without a food processor, but using a blender is a viable alternative. Make sure to use a high-powered blender, and start by blending small batches of nuts at a time to ensure they grind evenly. You may need to pause and scrape down the sides of the blender periodically to ensure all the nuts are ground uniformly.
- Start with small batches
- Pause and scrape down the sides
- Be patient and persistent
The texture of nut butter made in a blender may not be as smooth as that made in a food processor, but with patience and persistence, you can achieve a creamy consistency.
The
Using a Mortar and Pestle: A Traditional Approach
Using a mortar and pestle to make nut butter is a traditional and labor-intensive method, but it can be very rewarding. This method allows you to have more control over the grinding process and can result in a chunkier nut butter, which some people prefer.
Rolling Pin and Bag: A Simple Solution
For those looking for a simple solution to make nut butter without a food processor, using a rolling pin and a plastic bag can be an effective method. Place the nuts in a sturdy plastic bag, seal it, and use a rolling pin to crush the nuts until they reach the desired consistency.
Soaking and Drying Nuts
Why Soaking Nuts is Crucial for Smooth Butter
Crucial to the process of making nut butter without a food processor is soaking the nuts. Soaking nuts helps to soften them, making it easier to blend and achieve a smoother butter consistency. Additionally, soaking nuts can help to remove enzyme inhibitors and phytic acid, which can make nuts easier to digest and allow for better absorption of nutrients.
How to Dry Nuts for Grinding
For optimal results when making nut butter by hand, it is imperative to properly dry the nuts after soaking them. This can be done by spreading the soaked nuts in a single layer on a baking sheet and placing them in a dehydrator or oven set to a low temperature. The low heat helps to dry out the nuts without damaging their delicate oils and flavors.
It is important to fully dry the nuts before grinding them to prevent the butter from becoming too thick or clumpy. Properly dried nuts will grind more easily and result in a smoother, creamier nut butter without the need for a food processor.
Grinding and Blending
How to Grind Nuts into a Smooth Paste
Now that you have your nuts ready, it’s time to grind them into a smooth paste. You can use a mortar and pestle, a blender, or a coffee grinder for this step. Simply add a small amount of nuts at a time and grind until you achieve the desired consistency.
Adding Oils and Salts for Flavor and Texture
Any nut butter can be enhanced by adding oils and salts to improve both flavor and texture. These additives can help make the nut butter smoother and more spreadable. Experiment with different oils like coconut or olive oil, and salts like sea salt or Himalayan pink salt, to find the perfect balance for your taste preference.
The addition of oils and salts can significantly elevate the taste profile of your homemade nut butter. It’s important to start with small amounts and gradually adjust until you reach the desired flavor and texture.
Tips for Achieving the Perfect Consistency
The key to achieving the perfect consistency for your nut butter lies in the grinding process and the ratio of nuts to oils. Here are some tips to help you achieve the ideal texture:
- Roast the nuts before grinding to enhance their flavor.
- Add oils gradually to prevent the mixture from becoming too runny.
- Blend in short pulses to avoid overheating the mixture.
Assume that the nut butter will thicken slightly upon cooling, so aim for a slightly runnier consistency during the blending process.
Common Challenges and Solutions
Dealing with Oil Separation
Common challenges when making nut butter without a food processor include dealing with oil separation. When making nut butter by hand, the natural oils in the nuts tend to separate and rise to the top, leaving the rest of the mixture dry and difficult to spread.
Preventing Grainy Texture
Common issues in homemade nut butter can also include a grainy texture, which can be a result of not processing the nuts finely enough or not adding enough oil to create a smooth consistency.
Preventing a grainy texture in your nut butter can be achieved by ensuring that your nuts are finely ground and by adding a small amount of neutral oil, such as coconut or vegetable oil, to help create a smoother spread.
Overcoming Nut Butter Making Frustrations
Common frustrations when making nut butter without a food processor include the process taking longer than expected, the mixture not reaching the desired consistency, and the final product not being as smooth as store-bought nut butter.
Understanding that making nut butter by hand takes time and patience can help you overcome frustrations. Experimenting with different techniques, such as roasting the nuts before blending or adding honey for sweetness, can also help improve the texture and flavor of your homemade nut butter.
Storing and Enjoying Your Homemade Nut Butter
Storage Tips for Freshness and Safety
All good things must come to an end, and that includes the shelf life of your homemade nut butter. To keep your nut butter fresh and safe for consumption, store it in an airtight container in the refrigerator. This will help prevent the natural oils in the nuts from going rancid and maintain the flavor of your nut butter for longer. It is recommended to consume your homemade nut butter within 2-3 weeks for optimal freshness.
- Keep your homemade nut butter in an airtight container in the refrigerator.
- Consume your nut butter within 2-3 weeks for best quality.
Though it’s tempting to leave your nut butter at room temperature for easier spreading, refrigeration is key to maintaining its freshness and preventing spoilage.
Creative Ways to Use Your Homemade Nut Butter
If you’ve mastered the art of making nut butter without a food processor, why stop there? Get creative with how you enjoy your homemade nut butter!
Another fantastic way to enjoy your homemade nut butter is to incorporate it into your baking recipes. From cookies to brownies, nut butter can add a deliciously nutty flavor and creamy texture to your favorite treats. You can also drizzle it over yogurt, oatmeal, or even use it as a dip for fruits and veggies. The possibilities are endless!
Final Words
To wrap up, making nut butter without a food processor is indeed possible with a few alternative methods such as using a blender, a coffee grinder, or a mortar and pestle. Each method may require a bit more effort and time, but the end result is just as delicious and satisfying as using a food processor. With a little patience and creativity, you can still enjoy homemade nut butter even if you don’t have a food processor.
FAQ
Q: Can I make nut butter without a food processor?
A: Yes, you can make nut butter without a food processor using a blender or a high-powered blender like a Vitamix.
Q: What nuts can I use to make nut butter?
A: You can use a variety of nuts to make nut butter, such as almonds, peanuts, cashews, hazelnuts, and macadamia nuts.
Q: How do I make nut butter using a blender?
A: To make nut butter using a blender, simply add the nuts to the blender and blend on high for a few minutes, scraping down the sides as needed until you reach a smooth, creamy consistency.
Q: Can I add flavorings to my nut butter?
A: Yes, you can add flavorings such as honey, cinnamon, vanilla extract, or sea salt to your nut butter for added taste.
Q: How should I store homemade nut butter?
A: Store homemade nut butter in an airtight container in the refrigerator to keep it fresh. It can last for up to a few weeks in the fridge.